How to install a WordPress Theme

You can use WordPress Themes to change the appearance of your blog. WordPress usually comes with a few Themes preinstalled. First, you need to find the Theme you want. Here is how to do it the simple way:

  1. Log into WordPress Dashboard (/wp-admin)
  2. Click on “Appearance” -> “Themes” on the lower left, then “Add new”
  3. You can just take a look at the most popular Themes or search by keywords. Or just look at Featured or currently Popular Themes.
  4. Install the chosen Theme by clicking on “Install” or just preview it by clicking on “Preview”.
  5. After the installation you can choose the “Live Preview” (take a look but don’t activate it yet) or “Activate” the new Theme straight away.

If you have already downloaded a Theme in .zip-Format (e.g. because it isn’t available for free), you can install it by uploading:

  1. Log into WordPress Dashboard (/wp-admin)
  2. Click on “Appearance” -> “Themes” on the lower left, then “Add new”
  3. On the top of the page, right next to “Add Themes”, click on “Upload Theme”.
  4. Chose the .zip-file from your local computer and upload/install it by clicking on “Install now”.
  5. After the installation you can choose the “Live Preview” (take a look but don’t activate it yet) or “Activate” the new Theme straight away.

If you need are searching for a professional/premium Themes, I would recommend checking out Themeforest. There are a lot of great themes on there, so I’m pretty sure you will find one that suits your needs.

How to install a WordPress Plugin

You can use WordPress Plugins to extend the functionality of your blog. Let’s say you want a contact form, so your visitors can send you an email if they have a question. First, you need to find the Plugin you want. Here is how to do it the simple way:

  1. Log into WordPress Dashboard (/wp-admin)
  2. Click on “Plugins” on the lower left, then “Add new”
  3. You can just take a look at the most popular plugins or search by keywords.
  4. Install the chosen plugin by clicking on “Install now” – and you are done.

If you have downloaded a Plugin in .zip-Format (e.g. because it isn’t free), you can install it by uploading:

  1. Log into WordPress Dashboard (/wp-admin)
  2. Click on “Plugins” on the lower left, then “Add new”
  3. On the top of the page, right next to “Add Plugins”, click on “Upload Plugin”.
  4. Chose the .zip-file from your local computer and upload/install it by clicking on “Install now” – done!

If you need are searching for a specific functionality and cannot find any Plugin for that, let me know by Twitter or comment on this post. I will help you finding the Plugin you need!

How to install WordPress (manually)

Step 1: Prepare a new database

You will need a new database, so WordPress can save its data in it. If you are using iPage, you can use the installation tool, which automates the process.

If for some reason you would like to do it manually, follow the next steps. I describe them for iPage, but the steps will be similar for other hosting providers.

  1. Go to your Control Panel and login.
  2. Go to MySQL Database.
  3. Click on Add Database.
  4. Think of a database name (I would use a short form of the site the database is for) and login credentials (write those down somewhere) and type them in.
  5. Click Add Database.

Step 2: Upload WordPress files

In this step you upload the files of the WordPress software. WordPress is written in PHP, so you will see a lot of files ending with .php. We will unzip the files before uploading them, depending on your hosting account you could also do that after uploading, but unzipping before should work everywhere.

  1. Download WordPress (you can get it from WordPress.org).
  2. Unzip the latest.zip file by using decompression software (7zip is free and one of the best, but you can also use popular tools like WinRar or WinZip).
  3. Use a FTP program to connect to your hosting account. On Windows there is FileZilla for example, on Mac you can use CyberDuck.
  4. Now upload the unzipped WordPress files to the directory where you want them, e.g. /blog/.

Step 3: Use the WordPress Installation Script

Almost finished… now we use the WordPress install script to actually finish the installation. We need those database credentials you created before.

Use your web browser to go to the URL where you installed WordPress (so this will be either http://www.yourcoolblog.com or http://www.yourcoolblog.com/blog/ if you installed into a subdirectory). This also depends on the hosting configuration, they mostly allow you to configure the directory where the domain points to.

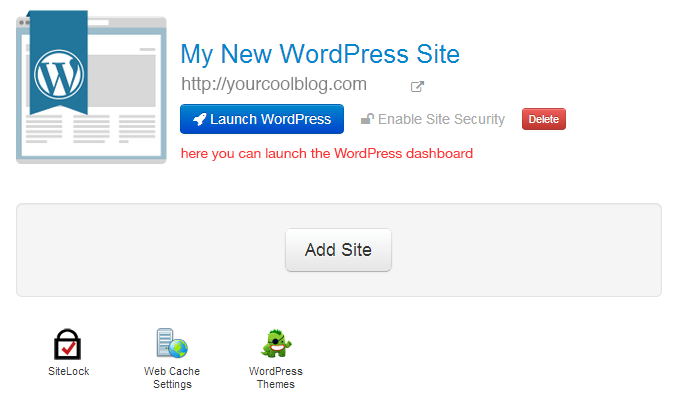
You will now be prompted to enter the database credentials you created before. After the installation process is complete, you can login to the WordPress Dashboard.That’s it!

How to install WordPress on iPage (automatically)

If you are hosting on iPage, this is how you install WordPress.

  1. Login to the Control Panel at iPage (link opens in new window).
  2. At the top navigation, click on WP Essential.
  3. If you have would already installed at least one WordPress site, you have toclick Add Site. If this is your first blog, just go to the next step.
  4. Fill in the fields, I marked them red for you:
    step1
  5. WordPress is now installing, just wait for it to finish up.
    step2
  6. Almost ready, click on “Let’s Get Started”.
    step3
  7. When clicking “Launch WordPress“, you get into the WordPress Dashboard. It’s the control center of your blog where you will spend the most of the time now 🙂
    step4